This tutorial is about interfacing a servo motor with nodemcu esp8266 WiFi module. A web page is served by the nodemcu which enlists the servo motor controls. User can connect to nodemcu esp8266 and access the web page. To open the web page in browser user has to type the HTTP address of the server serving the web page. There are two types of servo motors ac and dc servo motors. Ac servos work on alternating current and consumes lot of power. Lot of power means they can pick heavier loads. Ac servos are used in industrial applications. Ac servos can move their shaft precisely to any angular or linear position. They have a controller with feed back mechanism which is used for adjusting the control variables. Dc servo motors on the other hand are popular in medium applications like toys etc. Ac and dc servo motors can rotate forward and backward with 360 rotation. One can control the speed and velocity of servo motors easily using any servo motor controller available in market.
Servo motor in the tutorial
|
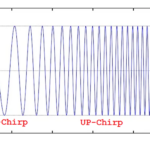
In this tutorial i am going to use dc servo motor. Dc servo motors are popular among the diy circuit makers. They are also used in toys and are know as RC servo motors. Rc servo motors are small, cheap and easy to use with systems involving microcontrollers or chips(Used in Toys) dedicated for a singular purpose. RC servos can rotate only 180 degree. Their purpose is to provide precise location in 0 to 180 degree angular field. Rc servo motor which i am going to use in the project is tower pro micro servo sg90. Sg90 servo motor works on 4.8 volts. Small torque produced by sg90 at 4.8 volts can displace a load of 1.8 kg per cm. sg90 servo motor shaft rotation depends on pwm signal frequency and duty cycle. Pwm frequency requirement for most RC servo motors is 50 Hz. They can rotate between 0 to 180 degree on pwm signal duty cycle between 1 milli seconds to 2 milli seconds. 1 milli second duty cycle at 50 hz frequency moves the servo shaft to 0 degree angle. 1.5 ms moves to 90 degree and 2 ms to 180 degree. You can calculate the duty cycles for other angles by your self. For example for 45 degree shaft rotation the duty cycle will be 45/180= 0.25 so 1(0 degree)+0.25= 1.25 ms.
|
Sg90 servo motor pwm signal requirements duty cycle and frequency
|

Tower pro sg90 servo motor picture and pin out is given below. Tower pro servo motor has 3 pins. Two are power pins and the third one is the pwm control pin. You can to connect the red lead to +5 volts. Make black ground. Connect the yellow lead with the pwm signal of the controller you are using in the project.
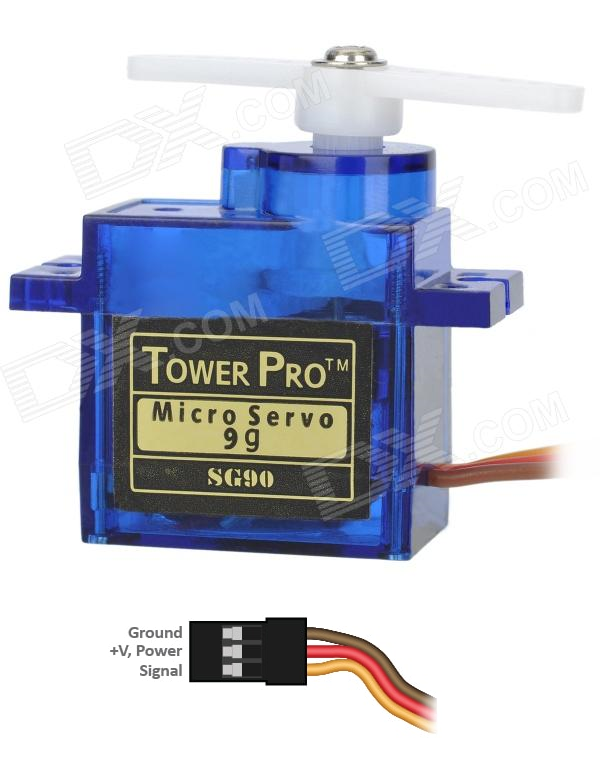
tower pro sg90 servo motor
Project circuit diagram
Nodemcu esp8266 works on 3.3 volts and servo motor requires 5 volts for its operations. So we need different power supplies for both the peripherals. Nodemcu is powered by the usb port of the computer and servo is powered with an another 5 volt adopter. GPIO-2 or D4 pin of nodemcu esp8266 12e is outputting pwm signal for servo motor rotation. Pwm signal output by the nodemcu is also in 3.3v TTL form. It must also be raised to 5v TTL before feeding the servo motor. I used a pair of transistors for this purpose. First transistor raises the pwm signal to 5 volts but inverts the signal. First transistor output is feed to input/base of the second transistor. Second transistor again inverts the signal and brings it back to the original shape of origination with TTL level raised to 5 v. Note the ground of both the nodemcu and 5 volt power supply are common grounded in the circuit.

Servo motor with nodemcu esp8266 WiFi module
Project code is written in arduino ide. Luckily arduino has plenty of libraries for each function it offers. For interfacing servo with arduino or boards supported by arduino ide their is a pre defined library named “Servo.h”. I included this library in my code and called its functions in code which are pretty easy to use. First the ‘ESP8366WiFi.h’ library us imported in code. This library contains functions used to initialize the nodemcu server and start the nodemcu esp8266 WiFi. Then ‘Servo.h’ library us imported. After it please enter the SSID and Password of the WiFi network to which you want your nodemcu to be connected to. I hope you are making this diy project at home, in this case you have to connect your nodemcu with your home WiFi router.
const char* ssid = “Your SSID”;
const char* password = “Your Wifi Password”;
Enter the SSID and Password in block quotes. In the setup function arduino serial communication channel is opened at 115200 bps baud rate. After wards nodemcu pwm(pulse width modulation) output pin is defined. Then the nodemcu request to your WiFi for an IP allotment and starting the server code statements are written.
|
Just make the circuit and upload the above code in your nodemcu WiFi module. Before uplaoding make sure the correct board is selected in the boards manage. After upload open the serial monitor of nodemcu. As soon as you open the serial monitor you will see nodemcu requesting your router for an IP allotment. After allotment of IP nodemcu will start its server and prints the server address on the serial monitor. This address is actually the address of the web page which has servo motor controls. You have to enter this address in your browser. If you see nothing in the serial monitor or just arbitrary and in complete characters look for the baud rate in serial monitor window. It must be set to 115200. Check for all possible lose connections.
|
|

Note: Both the server(nodemcu) and client(mobile, desktop, laptop and notebook) must be connected to the same WiFi network. In order to communicate with each other. If any one is on other network you will be unable to load the web page in browser.
When you get the server address in arduino serial monitor window like the one given above. You have to enter it in your browser. If your server and client is on the same network you will see the control page in your browser. Control page controls are given below.
When you get the server address in arduino serial monitor window like the one given above. You have to enter it in your browser. If your server and client is on the same network you will see the control page in your browser. Control page controls are given below.
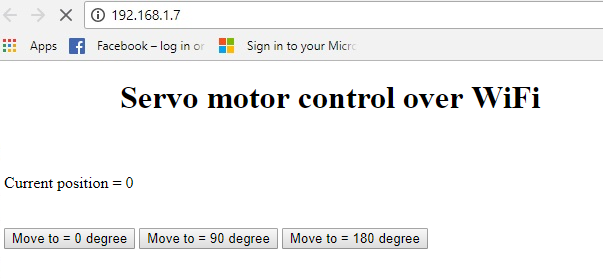
Servo motor with nodemcu esp8266 WiFi module web page control buttons
Control page shows the current status of the servo motor shaft. It also contains 3 buttons You can rotate the servo motor shaft at these three defined angles. What happens when you press the button? Loop function in code is continuously running. It is waiting for client request. When a request arrives it checks the contents of the request decodes them and performs the function as requested by the client(Moves the servo motor shaft). Before closing the connection loop function replies back the client with the current status of the servo motor shaft.
Future Work
This tutorial is limited to three angles only. For future one can define a text box in HTML page and takes the shaft rotation angle as input from user and rotates the shaft as inputted. This can be done using HTML forms and submit button.
Future Work
This tutorial is limited to three angles only. For future one can define a text box in HTML page and takes the shaft rotation angle as input from user and rotates the shaft as inputted. This can be done using HTML forms and submit button.
Download the project code. Folder contains arduino project .ino file. Code is open source. One can edit and modify it according to his needs. Please provide us your feed back on the project.
You may also like:


Filed Under: Electronic Projects, ESP8266
Questions related to this article?
👉Ask and discuss on Electro-Tech-Online.com and EDAboard.com forums.
Tell Us What You Think!!
You must be logged in to post a comment.