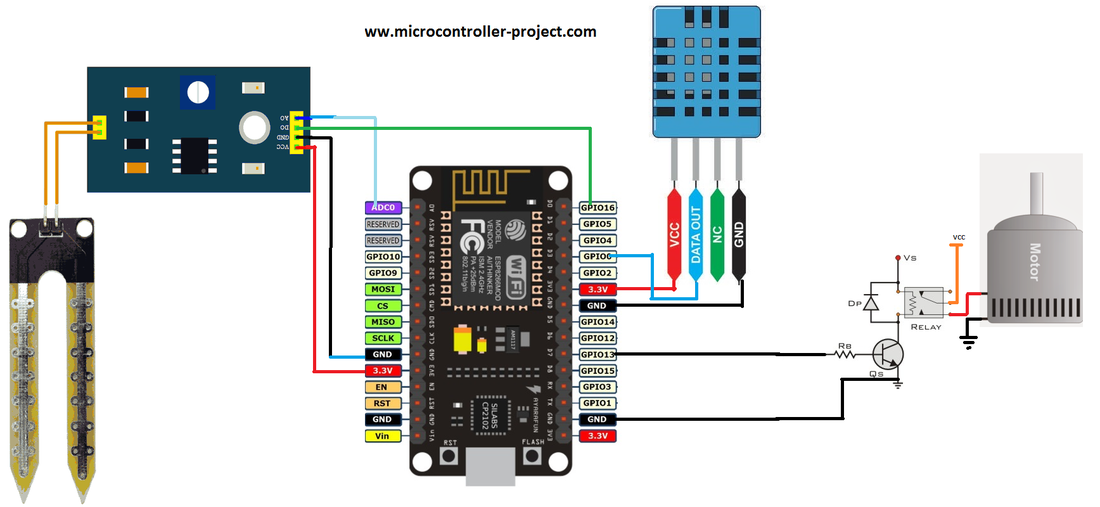
Engineers Garage

  • Electronic Projects & Tutorials
    • Electronic Projects
      • Arduino Projects
      • AVR
      • Raspberry pi
      • ESP8266
      • BeagleBone
      • 8051 Microcontroller
      • ARM
      • PIC Microcontroller
      • STM32
    • Tutorials
      • Audio Electronics
      • Battery Management
      • Brainwave
      • Electric Vehicles
      • EMI/EMC/RFI
      • Hardware Filters
      • IoT tutorials
      • Power Tutorials
      • Python
      • Sensors
      • USB
      • VHDL
    • Circuit Design
    • Project Videos
    • Components
  • Articles
    • Tech Articles
    • Insight
    • Invention Stories
    • How to
    • What Is
  • News
    • Electronic Product News
    • Business News
    • Company/Start-up News
    • DIY Reviews
    • Guest Post
  • Forums
    • EDABoard.com
    • Electro-Tech-Online
    • EG Forum Archive
  • DigiKey Store
    • Cables, Wires
    • Connectors, Interconnect
    • Discrete
    • Electromechanical
    • Embedded Computers
    • Enclosures, Hardware, Office
    • Integrated Circuits (ICs)
    • Isolators
    • LED/Optoelectronics
    • Passive
    • Power, Circuit Protection
    • Programmers
    • RF, Wireless
    • Semiconductors
    • Sensors, Transducers
    • Test Products
    • Tools
  • Learn
    • eBooks/Tech Tips
    • Design Guides
    • Learning Center
    • Tech Toolboxes
    • Webinars & Digital Events
  • Resources
    • Digital Issues
    • EE Training Days
    • LEAP Awards
    • Podcasts
    • Webinars / Digital Events
    • White Papers
    • Engineering Diversity & Inclusion
    • DesignFast
  • Guest Post Guidelines
  • Advertise
  • Subscribe

Smart garden weather station with nodemcu WiFi module

By EG Projects August 3, 2019

In the Internet of Things era, we now need to control everything over the Internet. Monitoring and controlling peripherals, devices, sensors, and nodes remotely saves time and resources. Many of us have gardens in front or back of our houses. A suitable amount of water and normal temperature are crucial for plants to remain green, stand still, and grow. It’s our utmost desire to water our plants in the garden when needed. In this project, I am going to solve this problem. I am going to monitor the garden temperature and soil moisture level. If the water content in the soil is less than the plants need, an autonomous switch will start the water pump for watering the plants. Users can now monitor and control the garden using cell phones, desktops, and laptops. 

Project circuit

I will measure the temperature and humidity levels and soil water moisture content and detect if there is rain in the garden. A pump will be driven if the plants require water. The sensors which I am using in the project are

  • DHT-11 Temperature and humidity sensor
  • Arduino soil and moisture level sensor
  • Nodemcu esp8266-12e WiFi module


DHT-11 is a one-wire digital temperature and humidity sensor. It can measure temperature from 0 degrees Celsius to 50 degrees Celsius with a 2% margin of error. It can measure humidity levels between 20 and 80% with a 5% margin of error. It requires 3 to 5 volts for its operation. I have another simple tutorial on interfacing DHT-11 with the nodemcu Wi-Fi module. You can learn more from that tutorial. Click the button below to learn more. 

Nodemcu WiFi with DHT-11 temperature sensor

I am using the soil/water/rain sensor, which I am using in the project, which is a popular water moisture sensor among diy circuit makers. It has two legs coated with nickel or copper. Normally, the resistance between the legs is high, and it decreases when we insert the legs into the ground. The moisture in the soil makes a path between the legs and starts conducting power. The conduction strength depends on the soil’s moisture level or water content. More water means more conduction. The output of the soil moisture sensor is analog and digital. Analog output depicts the ratio of water in the soil. Digital output shows that the moisture water content has reached or increased to the desired level. The rain/water sensor works on 3.3 to 5 volts. I also have a simple tutorial on interfacing the soil moisture sensor with nodemcu and checking water level over WiFi. Click the below button to learn more. 

Nodemcu interfaced with a soil moisture sensor

Upon checking the temperature and soil moisture content reading, plants need water if they are found to be low. I am going to drive a water pump/motor if soil moisture content is found to be low. For this purpose, I interfaced a relay with Nodemcu to drive heavy loads like motors, pumps, or water valves. The advantage of the relay is that it can drive direct and alternating power loads. You can connect direct current or alternating current motor/pump with a relay.  Another advantage of the relay is it isolates the load from the main circuit, and any damage to the relay does not impact the main controller.
Nodemcu works on 3.3 volts TTL logic. Its I/O pins also provide 3.3 volts as output. Relays need typically 5 volts to 12 volts for proper activation of coils. 3.3 volts are not enough to activate the relay coils, alternatively drive the motor/pump. To tackle this, I connected an NPN transistor with a relay and controlled its base with a nodemcu digital pin output. Now, the nodemcu 3.3-volt digital pin can drive a 12-volt relay. When the digital pin is high, the motor starts, and when it is made, it will stop. I also have another tutorial on interfacing relays with Nodemcu and controlling heavy loads. Click the below button to learn more.     

Interfacing Relay with nodemcu and controlling loads over WiFi

Project Circuit

Soil moisture sensor analog output is connected to nodemcu analog channel 0. The digital output of the soil/water/rain sensor is connected with GPIO-16 or D0 pin of nodemcu. The soil moisture sensor is powered with nodemcu 3.3-volt output. DHT-11 temperature and humidity sensor data output is connected to GPIO-0 or D3 of the nodemcu esp-8266-12e WiFi module. A 3.3-volt output of nodemcu also powers DHT-11. Note that there is one void pin out of dht-11. DHT-11 comes in two different pinouts. One has four pins and the other has 3 pins. I used the one with four pins. If you will interface the three-pin sensor, please check the correct pinout before connecting it with the nodemcu. Both the three-leg and four-leg dht-11 sensors work the same, there is no difference in the working method. T used the GPIO-13 or D7 pin of the nodemcu esp8266-12e WiFi module. to control the relay
​
Note: The transistor’s ground must be grounded with the nodemcu ground and also with the source power supply, Vs. Vs is the external power supply to the transistor to drive the relay. Vs depends on the relay you are using. If it’s a 12-volt relay, then Vs must be a 12-volt power supply. 

Connect the ground of the motor or pump with the power supply ground if it’s a DC pump. Connect the anode + lead of power to the relay’s NO(normally open) pin. Connect the com(common) pin of the relay to the motor anode. If the pump is working on alternating 110 or 220 volts, connect one lead of the pump directly to one end of the power rail and NC contact of the relay to another line of rail and comm of the relay to the second lead of the pump.

Nodemcu smart garden weather station circuit diagram

Nodemcu smart garden weather station circuit diagram
Coming to the code portion, first, necessary libraries are included for sensor optimization. Then, control pins are defined. Next, enter the SSID and password of the WiFi to which you want your Nodemcu to be connected. This is the most important step. Do not forget to do this before uploading the code to Nodemcu. Enter the SSID and Password in the block quotes.  

const char* ssid = “Your SSID”;
const char* password = “Your Wifi Password”;

In the setup function, nodemcu requests your WiFi router for an IP allotment. It then starts its server after IP allotment by the router. The serial communication baud rate is also initialized in the setup loop. The baud rate is set to 9600 bps.  
The main logic comes in the loop function after the successful initialization of pins and server start-up. In loop function i am checking for client requests. Temperature, humidity, soil moisture status, and other variables are calculated if any requests arrive. Before closing the request, the client is sent back a web page by the server containing the instant values of variables. The client can be a desktop, laptop, mobile, or notebook. Nodemcu works as a server; it serves as a web page. It responds to the client whenever the request is made.
One thing to take care of: Both the client and server must be on the same network, or in other words, they must be connected to the same WiFi. If they are not on the same network, there will be no communication between the client and server. So please be sure both are on the same network.
The headings and buttons above in the code are due to the HTML code in the Arduino ide. They are visible above because you are viewing them in a browser.
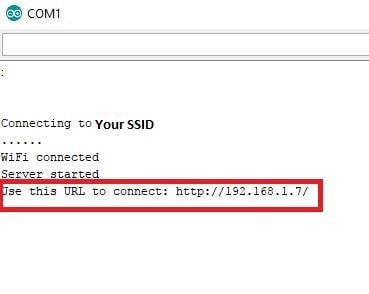
Just make the circuit and upload the code in nodemcu. After uploading the code, enter the Arduino serial monitor from Arduino ide. You will see nodemcu rebooting. They first connect to your WiFi router and then start the server. After the server starts up, it will show a web address. This web address is the address of the web page on which the user can see the smart garden status and weather update. The web address will be something like the one on the right side. To load the status web page, the user must enter this IP in his desktop, laptop, mobile, etc., browser.

Picture

After entering the above address in you browser a web page will be loaded. The format of the page will be something like the one given below. It displays the garden temperature on a Celsius and Fahrenheit scale. Humidity is the percentage, and moisture level is the percentage. It also shows the status of the motor/pump. If the pump is operational, the page will display the “Motor/Pump Operational” status. The page will display a “Motor/Pump at Halt” message if the water pump is not working.
The web page also contains three buttons. Pressing the update button will update the readings displayed on the page. Two other buttons turn off and on the motor/pump manually. You can turn the motor on and off through the web page.   

nodemcu smart garden monitoring over WiFi esp8266-12e

nodemcu smart garden monitoring over WiFi esp8266-12e
Download the project code. The folder contains the Arduino project .ino file. If you have any queries or questions, write them below in the comments section.
Code/Files

Filed Under: ESP8266, Microcontroller Projects


Next Article

← Previous Article
Next Article →

Questions related to this article?
👉Ask and discuss on EDAboard.com and Electro-Tech-Online.com forums.


Tell Us What You Think!! Cancel reply

You must be logged in to post a comment.

EE TECH TOOLBOX

“ee
Tech Toolbox: Internet of Things
Explore practical strategies for minimizing attack surfaces, managing memory efficiently, and securing firmware. Download now to ensure your IoT implementations remain secure, efficient, and future-ready.

EE Learning Center

EE Learning Center
“engineers
EXPAND YOUR KNOWLEDGE AND STAY CONNECTED
Get the latest info on technologies, tools and strategies for EE professionals.

HAVE A QUESTION?

Have a technical question about an article or other engineering questions? Check out our engineering forums EDABoard.com and Electro-Tech-Online.com where you can get those questions asked and answered by your peers!


RSS EDABOARD.com Discussions

  • Voltage mode pushpull is a nonsense SMPS?
  • Input impedance matching network
  • High Side current sensing
  • The comparison of different Tcl script checkers
  • Reducing "shoot-through" in offline Full Bridge SMPS?

RSS Electro-Tech-Online.com Discussions

  • Is AI making embedded software developers more productive?
  • Back to the old BASIC days
  • Parts required for a personal project
  • PIC KIT 3 not able to program dsPIC
  • Failure of polypropylene motor-run capacitors

Featured – RPi Python Programming (27 Part)

  • RPi Python Programming 21: The SIM900A AT commands
  • RPi Python Programming 22: Calls & SMS using a SIM900A GSM-GPRS modem
  • RPi Python Programming 23: Interfacing a NEO-6MV2 GPS module with Raspberry Pi
  • RPi Python Programming 24: I2C explained
  • RPi Python Programming 25 – Synchronous serial communication in Raspberry Pi using I2C protocol
  • RPi Python Programming 26 – Interfacing ADXL345 accelerometer sensor with Raspberry Pi

Recent Articles

  • What is AWS IoT Core and when should you use it?
  • AC-DC power supply extends voltage range to 800 V DC
  • Infineon’s inductive sensor integrates coil system driver, signal conditioning circuits and DSP
  • Arm Cortex-M23 MCU delivers 87.5 µA/MHz active mode
  • STMicroelectronics releases automotive amplifiers with in-play open-load detection

EE ENGINEERING TRAINING DAYS

engineering

Submit a Guest Post

submit a guest post
Engineers Garage
  • Analog IC TIps
  • Connector Tips
  • Battery Power Tips
  • DesignFast
  • EDABoard Forums
  • EE World Online
  • Electro-Tech-Online Forums
  • EV Engineering
  • Microcontroller Tips
  • Power Electronic Tips
  • Sensor Tips
  • Test and Measurement Tips
  • 5G Technology World
  • Subscribe to our newsletter
  • About Us
  • Contact Us
  • Advertise

Copyright © 2025 WTWH Media LLC. All Rights Reserved. The material on this site may not be reproduced, distributed, transmitted, cached or otherwise used, except with the prior written permission of WTWH Media
Privacy Policy

Search Engineers Garage

  • Electronic Projects & Tutorials
    • Electronic Projects
      • Arduino Projects
      • AVR
      • Raspberry pi
      • ESP8266
      • BeagleBone
      • 8051 Microcontroller
      • ARM
      • PIC Microcontroller
      • STM32
    • Tutorials
      • Audio Electronics
      • Battery Management
      • Brainwave
      • Electric Vehicles
      • EMI/EMC/RFI
      • Hardware Filters
      • IoT tutorials
      • Power Tutorials
      • Python
      • Sensors
      • USB
      • VHDL
    • Circuit Design
    • Project Videos
    • Components
  • Articles
    • Tech Articles
    • Insight
    • Invention Stories
    • How to
    • What Is
  • News
    • Electronic Product News
    • Business News
    • Company/Start-up News
    • DIY Reviews
    • Guest Post
  • Forums
    • EDABoard.com
    • Electro-Tech-Online
    • EG Forum Archive
  • DigiKey Store
    • Cables, Wires
    • Connectors, Interconnect
    • Discrete
    • Electromechanical
    • Embedded Computers
    • Enclosures, Hardware, Office
    • Integrated Circuits (ICs)
    • Isolators
    • LED/Optoelectronics
    • Passive
    • Power, Circuit Protection
    • Programmers
    • RF, Wireless
    • Semiconductors
    • Sensors, Transducers
    • Test Products
    • Tools
  • Learn
    • eBooks/Tech Tips
    • Design Guides
    • Learning Center
    • Tech Toolboxes
    • Webinars & Digital Events
  • Resources
    • Digital Issues
    • EE Training Days
    • LEAP Awards
    • Podcasts
    • Webinars / Digital Events
    • White Papers
    • Engineering Diversity & Inclusion
    • DesignFast
  • Guest Post Guidelines
  • Advertise
  • Subscribe