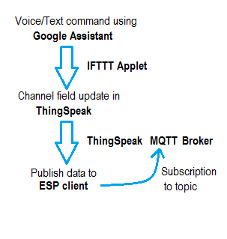
This article explains how to build a voice-based Home Automation to control Home Appliances. Google Assistant is used to input voice commands or text commands. The main intention of this project is to introduce various IoT tools and integrate them to build a real-time project. As home automation is a friendly project, it is chosen as an application. Ultimately, data transfer is the aim of IoT. IFTTT (IF This Then That) integrates Google Assistant and Webhook in an Applet created by us. It sends a particular URL through Webhook to control the desired appliance. MQTT Protocol is used for data transmission, and IFTTT sends the data to ThingSpeak MQTT broker though webhook URL. The data is updated in the topic, typically called a channel field in ThingSpeak MQTT. By subscribing to the channel field, the data related to the voice command is sent to ESP32 MQTT client by ThingSpeak MQTT broker. This project works over the internet, and so, appliances shall be controlled globally.
So, for this project, we need Thingspeak IoT MQTT Broker, IFTTT, Google Assistant. Arduino IDE is used to program the ESP32 WiFi Module. Let’s gather the access credentials from the respective user accounts of each.
ThingSpeak
ThingSpeak IoT channel should be created to hold the data. The data can be viewed through the channel fields. Each channel offers eight fields. The data is written or read from these channel fields through URL. Create an account (if not yet) and create a new channel. Enter the channel details (for your reference) and select the number of fields required and save the channel. Copy the write field URL from ‘API Keys’ Tab under ‘API requests’. The format is provided below. Replace the API key with your write Key and ‘DATA’ with the actual message/data. This URL writes to ‘field1’ of your channel. Replace field number with the desired field number. The written data presented in the ‘Private View’ option. This URL is used as the webhook in the IFTTT Applet.
https://api.thingspeak.com/update?api_key=XXXXXXXXXXXXXXXX&field1=DATA
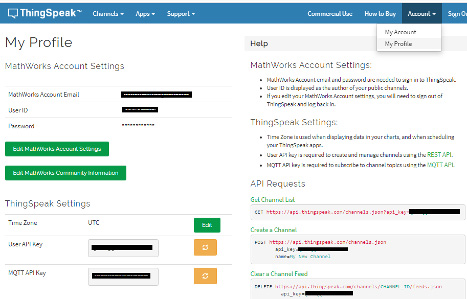
From the Account tab, under My profile option, get the MQTT API key, which is used in the program to connect to the ThingSpeak MQTT Broker. From the Channels tab under My channels option, get the Write and read API Keys. These keys are used in the program to subscribe or publish to the channel fields. In MQTT Protocol, writing and reading the data are referred to as publishing and subscribing. The MQTT API is available in the Account tab. The user name can be “any”. New API keys can be generated by reloading the desired key.
The commands can be sent through the ThingSpeak Android App also. Install the ThingSpeak App from the play store and login. Enter the Write/read API keys, channel, field number in the app, and enter the control keyword used in the program to control the appliance. The MQTT of ThingSpeak sends the data to the ESP32 Client after sending the command.
Now, let’s create the IFTTT Applet. After Login, click on the Profile icon and select Create option.
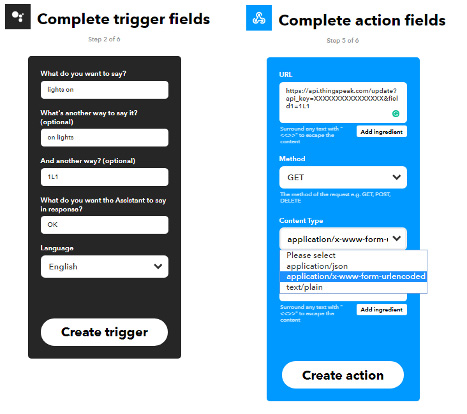
 Click on ‘this’ to select the input. Search for Google Assistant and select it. Select the option related to the type of phrase you wish to say. Write the phrase that you wish to spell to turn on an appliance. For example, type ‘Light ON’ to turn the light ON. Enter the different ways you wish to say. Then select the ‘create trigger’ option and click on ‘that’. Search for Webhook option and select it. Copy the above ThingSpeak write URL with the data (ex:’1L1’ used in the program code as appliance identifier) you wish to send and paste it in the URL column and select the content type as shown below. Then, click on the create action. If you don’t wish to receive Applet run notification each time you send a command, uncheck the option and Finish the Applet.
 Similarly, create a new applet for Lights Off with the data (ex:’1L0’). You can create as many applets as required to control the desired number of appliances. You can edit the data or commands later in the settings option of each Applet. Install the IFTTT Android App on your smartphone and login.
Google Assistant
Install Google Assistant on your smartphone to input voice commands. Say the phrase which you have entered in the applet or type it and send. IFTTT Applet sends the webhook and updates the field data of ThingSpeak IoT. The MQTT of ThingSpeak sends the data to the ESP32 Client as soon as it receives the data/command. Use this data to control the appliances.
Arduino
The program code is built with Arduino IDE. In the preferences tab, include the below link. Multiple links shall be included by separating them with a ‘,’ (comma).
https://raw.githubusercontent.com/espressif/arduino-esp32/gh-pages/package_esp32_dev_index.json
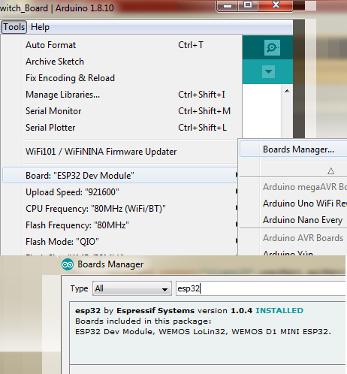
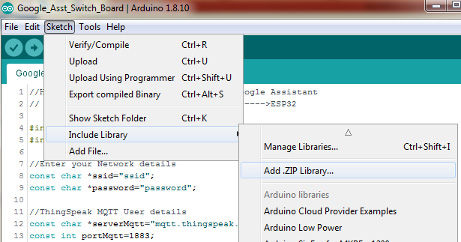
To upload the program code to ESP32 Module, download the Arduino core from the below GitHub page. After downloading the ZIP file, add this ZIP file through Arduino sketch/Include Iibrary/add.zip library. The board is installed through Tools/Board Manager. Search for ESP32 and install it. Later select the ESP32 DEV Board or the respective board being used.
https://github.com/espressif/arduino-esp32
 The program file is provided, and it contains the required explanation. This project uses WiFi and MQTT functions. Arduino core contains the WiFi header file, while the MQTT functions require PubSubClient.h. This is available from the below link. Download and add this ZIP Library through sketch/Include Library/Add.zip Library in the Arduino sketch file.
https://github.com/knolleary/pubsubclient
 The PubSubClient mode enables communication with the MQTT broker. Data transfer/receive through MQTT protocol is done in terms of Publishing and Subscribing to a topic. Topic is just like a file location over the hard disk. Each ‘/’ increases the level of the topic resembling a tree diagram. ThingSpeak MQTT broker has a format framed by the account details. Each channel offers eight fields enabled in the channel settings, so it provides eight topics to publish through a single channel. The write and read URL formats of a channel field are shown in the API Keys tab of each channel. Write/Read can be done by using them in the browser.
In this program, we are seeking data from the MQTT topic i.e.., subscribing to a topic in ThingSpeak while the data is updated from Google Assistant and Webhook i.e.., publishing to ThingSpeak topic. When a topic is subscribed, the incoming data to the subscribed topic is sent by the broker to the client/subscriber. To receive this data in real-time, a ‘callback’ function is used to collect the data. The topic format in ThingSpeak broker is shown below,
channels/<channel number>/subscribe/fields/field<number>/<read api key>
To publish a message to a topic, the below instruction is used. However, this is just provided for basic knowledge, but not used in the current project, as this project intends to introduce some of the tools used in IoT projects.
client.publish(“channels/<CHANNEL ID>/publish/fields/field1/<WRITE API KEY>”, “123”);
You may also like:


Filed Under: Electronic Projects, ESP8266
Questions related to this article?
👉Ask and discuss on Electro-Tech-Online.com and EDAboard.com forums.
Tell Us What You Think!!
You must be logged in to post a comment.