Arduino or Raspberry Pi : This is a common dilemma among electronics community of engineers whether they are DIY hobbyists or professionals working on a prototype. There may be a case that one might have worked on some microcontrollers and now willing to propel the academic excellence by working on development boards or do one needs to choose a development board for a do-it-yourself engineering project. Let’s have a fundamental understanding of both the boards to make clear which to select.
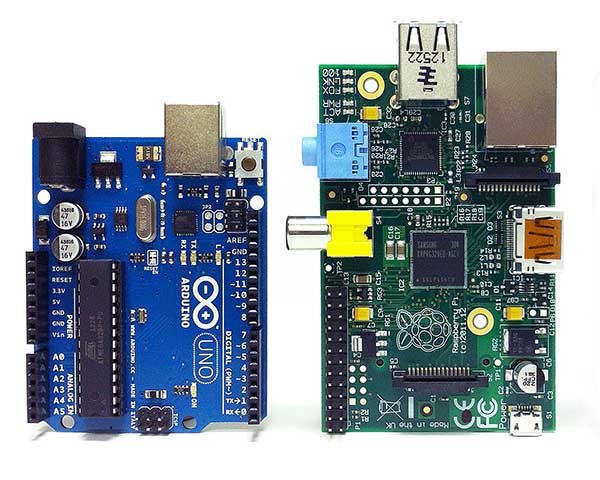 First thing is that both Arduino and Raspberry Pi offer a range of development boards with different specifications and features. There are a range of products offered at Arduino platform available under many categories. The Raspberry Pi platform also offers an array of products. You might need to use one of these products from Arduino or Raspberry Pi platform or there could be a possibility that you may need a combo because Arduino and Raspberry Pi are basically different but Complementary.
What is Arduino?
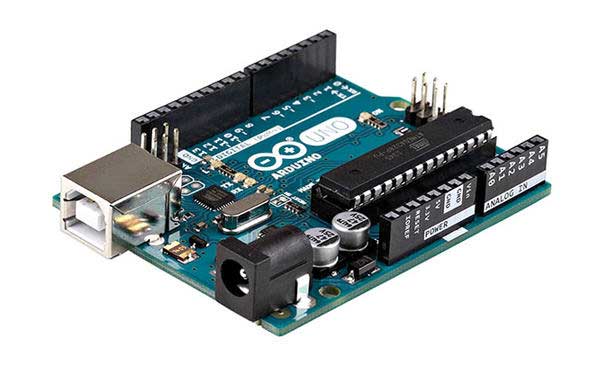
Arduino is an open-source electronics platform consisting of programmable circuit boards and an integrated development environment (IDE) where programs for running embedded systems applications can be written in C or C++. It is basically a series of microcontroller based development boards popular for simple and straight forward implementation of hardware projects. The heart of Arduino boards is 8-bit AVR microcontrollers. Arduino boards can be making use of controlling a wide range of sensors and actuators by loading add-on boards called Shields. There are shields available for controlling motors, interfacing the LCDs, and connecting to internet, cellular networks and wireless interfaces. The Arduino came into existence in 2005. It was developed by Massimo Banzi, David Cuartielles and David Mellis with an aim of reincarnating the Wiring Project by adding support for less costly ATmega8 microcontroller to the already successful Wiring platform. The motto was developing an open-source low-cost embedded electronics tool for non-engineers to build digital projects.
What is Raspberry Pi?
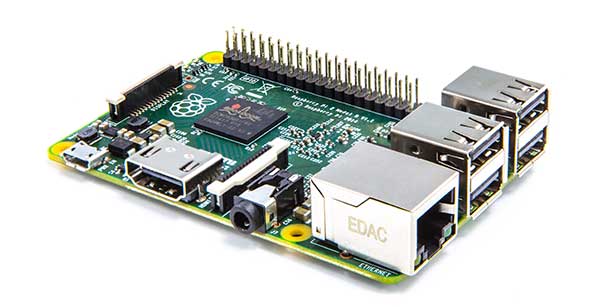
Raspberry Pi is a microprocessor based development board. In contrast to Arduino, the central unit of Raspberry Pi is a 32-bit 900 MHz Broadcom ARM Cortex-A7 or 32-bit 700 MHz Broadcom ARM Cortex-V6 microprocessor. Raspberry Pi is a System-on-Chip. It is a credit card sized Single Board Computer (SBC) developed for teaching basic computer science in schools and colleges. It is like a mini computer just like a desktop computer or notebook computer but with less processing power compared to the motherboards. The Raspberry Pi Foundation based in United Kingdom is the founder and promoter of the platform.
How to begin with Arduino or Raspberry Pi?
If anyone is interested in development boards for academic learning, both Arduino and Raspberry Pi are dimensionally different and offer different things to learn. The Arduino being a microcontroller board is quite useful for sensor based real-time applications where the program logics are not complicated but hardware interfacing is prime factor of the entire endeavour. Arduino runs on “Bare Metal” that is without any operating system just on the firmware. You only need an Arduino board, a bunch of sensors and actuators, Arduino IDE and you can tinker around with Arduino. It can be easily coded with Arduino language (a simplified version of C++) where the basic knowledge of C and HTML is the only pre-requisite. Raspberry Pi being a microcomputer is more useful for multi-media and internet-based applications where more software intelligence is needed and hardware interfacing is just a basic part of the project. Working on Raspberry Pi requires the knowledge of Linux and the python or Ruby scripting language. The Pi runs on Linux distributions. Raspbian is the Linux derivative that is officially supported by the Raspberry Pi platform. So all you need to get your hands dirty with Raspberry Pi is Raspberry Pi board with an LCD screen to get the visual hint of code execution, Scratch IDLE or other Linux supported IDE, knowledge of C, C++, Java and scripting languages like Ruby or Python and some crazy software ideas to implement.
Hence both platforms require different skill sets and offer different things for learning. For academic purpose, the selection between Arduino and Raspberry Pi can be derived from the following table :
| Factor | Arduino | Raspberry Pi |
|---|---|---|
| System Type | AVR Microcontroller based | ARM Microprocessor based |
| Bits | 8-Bits | 32-Bits |
| Operating System | None | Linux distributions like Raspbian (Official),Android, Plan9,RiscOS,X-Box Media Centre etc |
| Skills required | Arduino (C And HTML Pre-requisites) | C, C++, Java and Scripting Languages like Python, Ruby |
| Integrated Development Environment | Arduino | Scratch, IDLE and other Linux supported IDEs |
| Learning Focus | Hardware | Software |
| Application | Sensor based Real-Time applications | Multi-media and internet based applications |
You can choose any of the two according to your interest and preference or even why not learn both. A lot of applications require equal focus on hardware interfacing and software intelligence. These applications may require using Arduino in combination with Raspberry Pi, Android phone or other microcomputer. Learning both platforms will strong a foundation on both software and hardware aspect of the embedded electronics and allow you to make more innovative applications.
How and when to select Raspberry Pi or Arduino
How to select Arduino, Raspberry Pi or a Combo for your electronics project?
When it comes to selection of Arduino or Raspberry Pi for an electronics project, the choice may appear daunting at first. Both microcontroller and microprocessor are capable of computing but which is more useful when a specific application has to be implemented.
Price is not a Matter
Both Arduino and Raspberry Pi have competitive prices. Raspberry Pi is only slightly costlier than Arduino boards. Raspberry Pi 2 Model B costs around $29 and Raspberry Pi 3 Model B latest on the platform costs around $29.99 at element14, the official distributor of Raspberry Pi boards. Arduino UNO costs around $24.95 and Arduino Pro Mini costs around $18.05. The official global distributors of Arduino boards are Mouser, RS-Components and Digi-Key. A list of other distributors is available on the Arduino site. The Wi-Fi/802.11 shield for Arduino costs around $49.90. So, it is not the matter of price but the kind of application you want to implement which matters.
When to choose Arduino?
Arduino will be the perfect choice for your embedded electronics project if one or more requirements or conditions stated below compliment with your electronics projects :
1. Iterative tasks – If your application needs to perform a sequence of instructions repetitively without many intelligence factors, Arduino suits your application. Microcontrollers are supposed to execute their code in iterative manner.
2. Do not need Multi-tasking – If the logic of your application does not involve more than two tasks, you can safely resort to Arduino as a choice. Like your project needs to sense temperature and humidity and display it to a screen, you can confidently choose Arduino. But, if your project involves multi-tasking, like your project needs to sense temperature and humidity, display it to a screen, log the temperature information, compare the temperature information on a day-to-day basis and predict future weather conditions on the basis of recorded analytics and also display a weather forecast on the screen, Raspberry Pi should be your choice.
3. Do not need networking – Arduino does not have in-built Ethernet port. If a project built on Arduino needs networking, it has to connect with external hardware called Shields and need to properly address the connected networking peripherals. The Wi-Fi/802.11 shields can be bought from mouser website under communication tools category.
4. Real-time functioning – Raspberry Pi is not real-time. It schedule tasks like a regular computer does. But Arduino being a microcontroller board implements the code in real-time. If your application needs a real-time execution of tasks by immediately responding to a call to action, Arduino should be your selection.
5. Analog Sensor Connectivity – Arduino is best suited when sensor connectivity is a vital part of your project. Like Arduino UNO has 14 digital and 6 analog input and output pins. Arduino boards can also give analog output in the form of pulse-width modulated (PWM) signals. Arduino can be attached to any actuator or sensor by using add-on boards or Shields. Contrary to this, Raspberry PI does not have analog input and output pins. It has only 8 digital GPIO pins. Analog sensors can be connected to a Raspberry Pi board only by interfacing through other chips like MCP3008 or using HAT (Hardware Attached on Top) boards. HAT boards are like backplanes attached to Single Board Computers (SBCs).
6. Plug and Play Application – Because a Raspberry Pi board after switching ON first loads the Linux operating system and then executes the application code, it can get damage or get its operating system or program code corrupted, due to sudden power shut down or improper shutting down of the project by human error. In this case, Arduino is more suitable for plug and play applications as it runs on firmware and directly executes the program code in an iterative manner.
7. Power Consumption – Arduino has an operating voltage of 5V and can control sensors and actuators operating over a voltage of up to 20V as its input pins can tolerate these much voltages but Raspberry Pi operates within an operating range below 5V and needs a proper shut down mechanism. However, both the boards have low power consumption and can be used for long time without replacing the power supplies.
8. Price – If you need to implement a simple application, Raspberry Pi can prove to be a slightly over-priced selection. Many Arduino boards are three times cheaper than Raspberry Pi and can be used for implementing simple applications. Moreover, implementing a simple application on Pi will be wastage of its better computing resources.
When to choose Raspberry Pi?
Speedy Complex Computing – Raspberry Pi edges over the Arduino when it comes to computing power. It is based on 32-bit microprocessor, has a clock speed of 700 or 900 MHz and has 256 to 512 Mb of RAM. The computing power and specifications of Arduino boards look timid here. They are based on 8-bit microcontroller, run on 8 to 84MHz clock speeds and have 2Kb RAM. Obviously, a Pi can perform more complex computing operations and that too, 40 times faster.
 Storage – The Pi comes with SD cards for storage with capacity from 2GB to 16GB. While the Arduino boards have only 32Kb or 512 Kb flash memory. If your application code requires more storage or requires logging large amounts of data, Pi is the solution.
Operating System – Arduino runs on firmware and has no scope of loading any operating system by design and storage limitations. If your application is complex enough to require an operating system to sit below the main execution code, go for the Raspberry Pi.
Computer Interfacing – If your project requires communicating with a computer, phone or other microcomputer, Pi has two peripheral USB ports to ease the task. Arduino is equipped with a single input-only USB port for flashing firmware to it from a computer. Therefore, go for Pi if your project requires data communication with other computing devices.
Multi-tasking – Arduino just not have the design and processing power to perform multi-tasking. Raspberry Pi has more RAM, speed and processing power to perform scheduled tasks in a multi-tasking role.
Multimedia Application – Raspberry Pi is equipped with the audio and video output. Hence, it is easy to program a multi-media application on it. Contrary Arduino have only basic functionality in this respect. It can only run multimedia applications by interfacing to Shields and it will also require other networking add-on boards to send audio and video data to other systems. Making a multimedia application on Arduino is costlier and cumbersome.
Networking – Again Pi has Ethernet port on the board and can easily connect to internet or local computer networks with the help of LAN or Wi-Fi USB dongles. The Arduino will require add-on boards/Shields to connect with LAN or Wi-Fi.
When to choose Arduino and Raspberry Pi Combination?
Both the boards have I2C interface and can serially communicate through it. A lot of applications have sensor or hardware interfacing as a vital requirement and need complicated software intelligence as well. In such a case a combination of Arduino and Raspberry Pi works the best. The hardware peripherals like sensors and actuators can be interfaced to an Arduino board with all real-time and iterative tasks implemented at the Arduino end and Arduino can be controlled by a Raspberry Pi on I2C for multitasking, additional software intelligence, data logging and analytics and communication of data, audio or video messages to other devices via LAN or Wi-Fi.
Prototyping a product – Is Raspberry Pi is entirely open-source !
Raspberry Pi and Arduino are easy to use and easily available. While Arduino is completely open-source but when prototyping a product using Raspberry Pi, there have been certain uncertainties. The Pi board is an open-source hardware except ARM processor and Broadcom SoC and utilizes a closed source firmware. Though an unofficial open-source firmware is also available. For building on ARM processors, one needs to sign a Non-Disclosure Agreement (NDA) with ARM to get the chip documentation. Similarly, using the SoC built on the ARM processor requires signing a Non-Disclosure Agreement with Broadcom to get the SoC documentation. Consequently, one needs to provide a business model and report the number of ARM processor or Broadcom SoC used in the product and so sold to the ARM or Broadcom respectively. This is what the Raspberry Pi foundation has done and is the reason that SoC or processor design specifications are not open. The Pi has been designed and developed for educational purpose and the foundation maintains that the Pi can be used for building a commercial product without buying special permissions or licenses. Though the foundation encourages including the words “Powered by Raspberry Pi” somewhere on the product. The foundation is also willing to get mailed if Pi is used commercially. The Pi-powered souvenir photo printer is one such product. Read more about starting a business with Raspberry Pi.
Applications of Arduino, Raspberry Pi and Arduino-Raspberry Pi Combo
For a project, go for Arduino if requirements are sensor and hardware interfacing, real-time implementation of few tasks, interfacing of analog devices or the project is a plug and play application. One should choose Raspberry Pi, if the project is more focussed on software implementation, have audio and video involved, requires multi-tasking and superior computing performance or needs communication with other devices through internet or LAN. If the project has a balanced hardware and software orientation, get a combination of Arduino and Raspberry Pi. Implement sensor and actuators interfacing with all real-time controls implemented at the Arduino board and make Arduino board communicate to Raspberry Pi through I2C. And let Raspberry Pi handle complex computing, data logging, data analysis, communication over internet or LAN and audio and video aspects of the application.
Some interesting applications that can be made on Arduino are –
You may read our blog and article section for more topics on electronics engineering, industry, and technology.
Filed Under: Arduino Projects, ARM, AVR, PIC Microcontroller, Raspberry pi, Tech Articles
Questions related to this article?
👉Ask and discuss on EDAboard.com and Electro-Tech-Online.com forums.
Tell Us What You Think!!
You must be logged in to post a comment.