
Note: it’s recommended to follow this VHDL tutorial series in order, starting with the first tutorial. Follow the full series here. In the previous Verilog Tutorial – 14, we learned how to design circuits for a 1×8 demultiplexer and an 8×1 multiplexer in Verilog. In this tutorial, we’ll: Write a Verilog program to build a clocked SR latch…
Verilog Tutorial 14: How to design a 1×8 demultiplexer and an 8×1 multiplexer in Verilog
Note: it’s recommended to follow this VHDL tutorial series in order, starting with the first tutorial. Follow the full series here. In the previous Verilog Tutorial – 13, we learned how to design a 3×8 decoder and an 8×3 encoder in VHDL. In this tutorial, we’ll: Write a Verilog program to build circuits for a 1×8 demultiplexer and an…
Verilog Tutorial 13: How to design a 3×8 decoder and an 8×3 encoder in VHDL
Note: it’s recommended to follow this VHDL tutorial series in order, starting with the first tutorial. Follow the full series here. In the previous Verilog Tutorial – 12, we learned how to design half and full-subtractor circuits in Verilog. In this tutorial, we’ll: Write a Verilog program for building circuits for a 3×8 decoder and an 8×3 encoder…
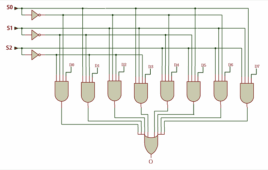
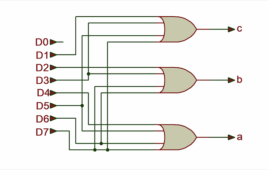
Verilog Tutorial 12: How to design 8-bit parity generator and checker circuits in Verilog
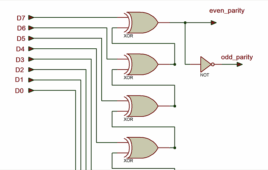
Note: it’s recommended to follow this VHDL tutorial series in order, starting with the first tutorial. Follow the full series here. In the previous Verilog Tutorial – 11, we learned how to design half and full-subtractor circuits in Verilog. In this tutorial, we’ll: Write a Verilog program to build an 8-bit parity generator and checker circuits Verify the…
Introduction to batteries and their types
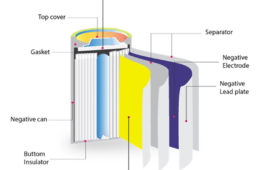
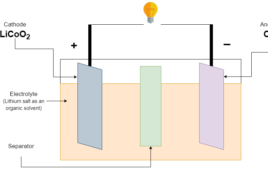
What is a Battery? A battery is an electrochemical device that can store energy in the form of chemical energy. It translates to electric energy when the battery is connected in a circuit due to the flow of electrons because of the specific placement of chemicals. It was invented by Alessandro Volta, whereas Gaston Plante…
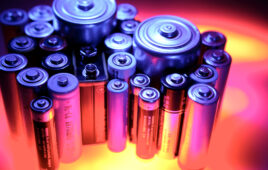
What are the different battery types for specific applications?
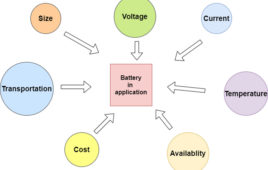
How to choose right battery for a application? In this article, we will learn how to choose a battery according to the specifications and requirements of your application. Some applications need more power and some need to be cheap with less power. There are various factors and parameters that to consider when choosing the best…
How rechargeable batteries, charging, and discharging cycles work
How rechargeable batteries, charging, and discharging cycles work The battery stores electrical energy in form of chemical energy and the chemical energy again able to convert into electrical energy. The conversion of chemical energy to electrical energy is called discharging. The chemical reaction during discharge makes electrons flow through the external load connected at the…
Battery configurations (series and parallel) and their protections
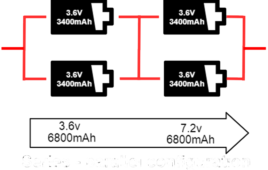
Configuration in Batteries and their protection A single cell is not sufficient for some devices. To achieve the desired voltage, the cells are connected in series to add the voltage of cells. To achieve the desired capacity, the cells are connected in parallel to get high capacity by adding ampere-hour (Ah). This combination of cells…
What to consider when evaluating battery performance
Several important metrics and considerations are important when evaluating battery performance: Cell, module, and pack level: It is important to consider whether the data refers to an individual cell or a complete battery pack when comparing energy and power densities. Cells will always have the highest energy and power for a given size or weight.…
Understanding battery management systems
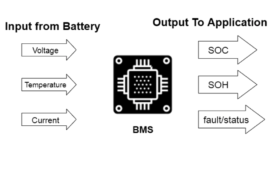
A battery-management system (BMS) is an electronic system or circuit that monitors the charging, discharging, temperature, and other factors influencing the state of a battery or battery pack, with an overall goal of accurately indicating the remaining time available for use. It’s used to monitor and maintain the health and capacity of a battery. Today’s…
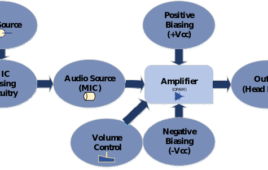
Basics of Audio Amplifier – 1/9
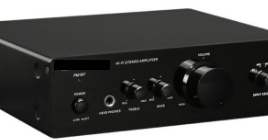
Audio is one of the most common media. Here, It refers to the representation of sound which can be perceived by humans. Audio and Video are the essential component of any electronic media. The electronics can be used to receive audio signals (via microphone), record audio in some storage, transmit audio (through wired or wireless communication channels) and reproduce audio signals (via speakers). The audio can be represented and transmitted as either analog signals or digital signals. In this series, analog audio signals are the concern. The audio signals have a frequency range of 20 Hz to 20,000 Hz.
Designing 250 Milli Watt Audio Power Amplifier – 2/9

In the previous tutorial, basics of audio amplifiers were discussed. It has been already mentioned that on the basis of application, there are two types of audio amplifiers – 1) Pre-Amplifier2) Power Amplifier The pre-amplifiers are used to level up the audio signals from a microphone or audio source to standard voltage levels while the power amplifiers are generally used at the output stage of the audio systems to boost audio signals before they are reproduced by the speakers. In this tutorial, a power amplifier with 250 Milli-Watt output power will be designed.
Designing 1 Watt Audio Power Amplifier – 3/9
In the previous tutorial, a 250 Milli Watt Audio Power Amplifier was designed using LM-386 power amplifier IC. On the basis of application, the audio amplifiers can be categorized into two classes – 1) Pre-Amplifier2) Power Amplifier The pre-amplifiers are used to level up the audio signals from a microphone or audio source to standard voltage levels while the power amplifiers are generally used at the output stage of the audio systems to boost audio signals before they are reproduced by the speakers. In this tutorial, a power amplifier with 1 Watt output power will be designed. The audio amplifier designed in this project will operate in range from 20 Hz to 20 KHz which is the same as of the audible range of frequencies by humans. The amplifier circuit will be designed to have a variable voltage gain in range from 26 dB to 46 dB.
Designing a Bass Boost Amplifier – 4/9
In the previous tutorial, 1 Watt Audio Power Amplifier was designed. On the basis of application, the audio amplifiers can be categorized into two classes- 1) Pre-Amplifier2) Power Amplifier The pre-amplifiers are used to level up the audio signals from a microphone or audio source to standard voltage levels while the power amplifiers are generally used at the output stage of the audio systems to boost audio signals before they are reproduced by the speakers. In this tutorial, a Bass Boost amplifier with 1 Watt output power will be designed. The audio amplifier designed in this project will operate in range from 20 Hz to 20 KHz which is the same as of the audible range of frequencies by humans. The amplifier circuit will be designed to have a variable voltage gain in range from 26 dB to 46 dB.
Designing a 6 Watt Car Audio Amplifier – 5/9
In the previous tutorial, a Bass Boost Power Amplifier was designed. Now it’s time to start designing power amplifiers suitable for specific applications. In this tutorial, a car audio amplifier will be designed. The cars have been coming with inbuilt audio systems from years. An audio system of a car is one of the important features that shines as unique selling point (USP) for any car in the market. The audio systems have become a vital accessory for any car. Even many times consumers replace the default audio systems came in their car with new one for better driving experience.
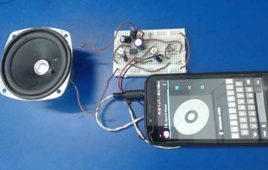
Design a low power amplifier for headphones- 6/9
Continuing with the designing of application specific power amplifiers, in this tutorial a low power amplifier will be designed for regular mobile headphones. In the previous tutorial, a car audio amplifier using TDA2003 IC was designed. The mobile headphones are a type of miniature speakers designed especially for use with smart phones. These headphones do not have louder sound output. However, their sound quality can be improved by using an amplifier circuit with them. For headphones, a low power amplifier need to be designed.
Controller Chip Selection for Developing USB Enabled Device (Part 6/6)
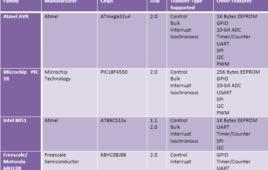
In this series, every possible detail about the USB system including its architecture, protocols, requests and descriptors as well as signaling and encoding has been already discussed. Wrapping up the series, selection of the controller chip for the development of a USB enabled device is discussed here.
Signal and Encoding of USB System (Part 5/6)
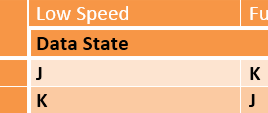
In this series, USB requests and descriptors have been already discussed. With the knowledge of USB requests, descriptors, transfer types and transactions it is now easy to understand how data is communicated over USB interface. Another aspect of the USB communication is line states and encoding, which is generally ignored by the system designers as a USB device can be designed without knowing the Signaling and Encoding schemes. The signaling and encoding schemes are implemented at the lower levels (usually on the controller IC) and usually gets abstracted during system designing. However, understanding the terms related to bus states and encoding would help in getting comprehensive view of the USB System.
USB Requests and Stages of Control Transfer (Part 4/6)
In the previous article of this series, USB Descriptors were discussed. When a USB peripheral is connected to a host device, the host sends queries in the form of requests. The peripheral responds by sending Descriptors. The Descriptors contain the information required for identifying and configuring the peripheral device, implementing the interfaces and setting endpoints. The device descriptor is the first descriptor sent to the host and it helps in configuring the peripheral with respect to the host. The subsequent descriptors implement the functioning, the peripheral is meant for. The Control Transfer is the only transfer type which is supported even when the device is yet not configured. That is the reason, it is used for sending requests and obtaining the descriptors. The default endpoint is endpoint 0 which is bidirectional and used for control transfers.
USB Descriptors and their Types (Part 3/6)
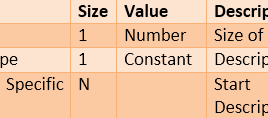
Now that we have discussed the basic details of USB including its features, architecture, and protocol, the next topic in the series is USB Descriptors. In context to USB interface, Descriptors are formatted blocks of information, through which, the host device learns about the peripheral. It helps in identifying and configuring the peripheral device.A Descriptor contains information like type of the device, Vendor ID, Compliant USB Version, number of configurations device supports, number of endpoints, etc. The USB peripheral must respond with descriptors when requested by the host. During enumeration, the host uses control transfer to request the device for descriptors.