Engineers Garage

  • Electronic Projects & Tutorials
    • Electronic Projects
      • Arduino Projects
      • AVR
      • Raspberry pi
      • ESP8266
      • BeagleBone
      • 8051 Microcontroller
      • ARM
      • PIC Microcontroller
      • STM32
    • Tutorials
      • Audio Electronics
      • Battery Management
      • Brainwave
      • Electric Vehicles
      • EMI/EMC/RFI
      • Hardware Filters
      • IoT tutorials
      • Power Tutorials
      • Python
      • Sensors
      • USB
      • VHDL
    • Circuit Design
    • Project Videos
    • Components
  • Articles
    • Tech Articles
    • Insight
    • Invention Stories
    • How to
    • What Is
  • News
    • Electronic Product News
    • Business News
    • Company/Start-up News
    • DIY Reviews
    • Guest Post
  • Forums
    • EDABoard.com
    • Electro-Tech-Online
    • EG Forum Archive
  • DigiKey Store
    • Cables, Wires
    • Connectors, Interconnect
    • Discrete
    • Electromechanical
    • Embedded Computers
    • Enclosures, Hardware, Office
    • Integrated Circuits (ICs)
    • Isolators
    • LED/Optoelectronics
    • Passive
    • Power, Circuit Protection
    • Programmers
    • RF, Wireless
    • Semiconductors
    • Sensors, Transducers
    • Test Products
    • Tools
  • Learn
    • eBooks/Tech Tips
    • Design Guides
    • Learning Center
    • Tech Toolboxes
    • Webinars & Digital Events
  • Resources
    • Digital Issues
    • EE Training Days
    • LEAP Awards
    • Podcasts
    • Webinars / Digital Events
    • White Papers
    • Engineering Diversity & Inclusion
    • DesignFast
  • Guest Post Guidelines
  • Advertise
  • Subscribe

How to create a geofence using Arduino

By Nikhil Agnihotri December 4, 2024

Geofencing is a technology that creates virtual boundaries around a specific physical location using tools like GPS, Wi-Fi, RFID, or cellular networks. It enables control over the movement or use of an object or device within a defined geographic area.

To establish geofencing, virtual parameters are set around a designated area using special software that defines boundaries in any shape or size, such as a simple circular radius around a fixed point. When a device or object crosses the boundary, it triggers predefined actions, such as sending an alert, switching off a device, or initiating tracking.

In this project, we’ll use GPS technology to geofence an Arduino device around a fixed location. When the device moves outside the defined radius, it will send an SMS alert to a registered mobile number, providing the current location of the device.

Components

  1. Arduino Mega x1
  2. SIM900A GSM/GPRS modem x1
  3. Neo-6M GPS module
  4. SIM card
  5. Connecting or jumper wires

Circuit connections

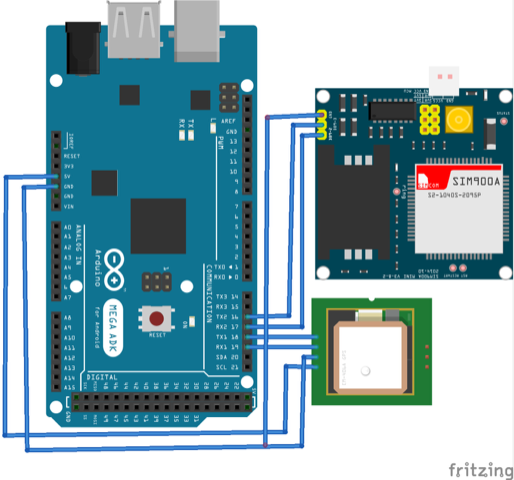
To build this geofencing device, you’ll need to connect a SIM900A GSM/GPRS modem and a Neo-6M GPS module to an Arduino board. We’ve chosen Arduino Mega becuase it includes multiple hardware UART ports, but other Arduino boards can also be used. However, they might require software serial for communication.

To interface the GPS module with Arduino Mega:

  • Connect the GPS module’s VCC and GND pins to Arduino’s 5V output and GND pins.
  • Connect the GPS module’s TX and RX pins with Arduino’s RX1 and TX1 pins, respectively.

For the GSM/GPRS modem:

  • Connect the modem’s GND, TX, and RX pins to Arduino’s GND, RX2, and TX2 pins.
  • Then power it using an external adapter.

Note, the entire circuit can be powered using a regulated battery supply for portability and reliability.

The sketch

Replace the values of the “inilat” and “inilng” variables with the GPS location’s latitude and longitude coordinates of the desired geofence location. Also, replace the variable “PHONENUMBER” with the number you’ll receive the alerts on.

Then, upload the following code to Arduino.

How it works

A fixed GPS location is hard-coded in the Arduino sketch with its latitude and longitude stored as “initial latitude” and “initial longitude.” Arduino initializes the GSM modem to send an SMS alert to the registered mobile number, which is hard-coded in the sketch.

Arduino then retrieves the current location of the device, calculating the distance between the current location and the initial location using the following formula.

x = Sin((lat1-lat2)/2.0)*Sin((lat1-lat2)/2.0) + cos(lat1)*cos(lat2)*sin((lng1-lng2)/2.0)*sin((lng1-lng2)/2.0)

distance (in meters) = (2*atan2(sqrt(x),sqrt(1.0-x)))* 6371000.0

Remember the latitude and longitude values (i.e., lat1, lng1, lat2, and lng2) are in the radian. If the distance between the two locations is greater than 50 meters, an SMS alert is sent to the registered mobile user with current location.

The code

The sketch begins by using the TinyGPSplus library. This library is required for getting the GPS location from the data received via the GPS module. An object of the TinyGPSplus class is initialized.

Next the variables are declared to store the:

  • Current latitute in degrees
  • Current longitude in degrees
  • Current latitude in radians
  • Current longitude in radians
  • Initial latitude in degrees
  • Initial longitude in degrees
  • Initial latitude in radians
  • Initial longitude in radians
  • Difference between the two latitudes
  • Difference between the two longitudes
  • Calculations and distance between the two GPS locations

Variable are also declared to store the registered phone number and to set the status of the alert message. The maximum distance from the initial location or the radius of the geofence is set to 50 meters.

The user-defined function sendATCommand() is used to send the AT commands to the SIM900 GSM modem. In the setup() function, the baud rate for communication for both the GSM and GPS modems is set to 9600 bps. The GSM modem is then initialized for text messages by sending a series of AT commands.

The user-defined function sendAlert() forwards the SMS alert with the current location to the registered mobile number. The SMS is sent by sending a series of AT commands to the GSM modem.

In the loop() function, Arduino checks for any GPS data. If it receives data, it retrieves the current location. The latitude and longitude of current location are calculated with the latitude and longitude of the initial or fixed reference location. The distance between the two locations is calculated according to the equation stated above.

If the calculated distance is greater than the maximum distance (i.e., the radius of the geofence), the alarm variable is set to TRUE and an SMS alert is sent by calling the sendAlert() function. Otherwise, the alarm variable is FALSE.

A delay of one minute is provided upon completion of the loop. Location tracing starts again after this minute is up.

Results

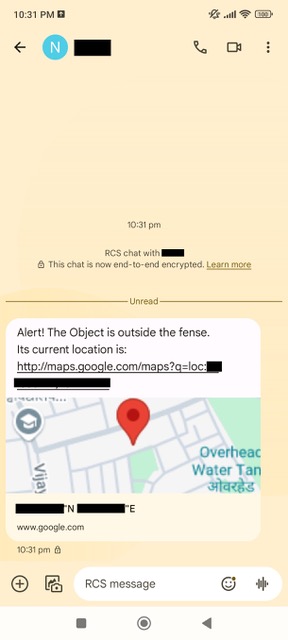
For this project, we configured the fixed reference location in the sketch with the GPS coordinates of our city — approximately 12 kilometers from our current position. Since the distance between the reference location and our current position far exceeded the geofence radius of 50 meters, the device triggered an SMS alert. The alert was sent to the registered mobile number, providing our current location as follows.

You may also like:


  • What are the most practical and useful modern spy gadgets?

  • How to build a GPS tracking device?

  • How does a smartwatch work as an embedded system?

  • How to set-up and build a project using Arduino IoT…

  • How to build a real-time vehicle tracking system

  • What are Global Navigation Satellite Systems (GNSS) and how are…

  • What is a Global Positioning System (GPS)?

Filed Under: Electronic Projects
Tagged With: Arduino, electronicprojects, geofence, geofencing, gps, modem
 

Next Article

← Previous Article
Next Article →

Questions related to this article?
👉Ask and discuss on Electro-Tech-Online.com and EDAboard.com forums.


Tell Us What You Think!! Cancel reply

You must be logged in to post a comment.

EE TECH TOOLBOX

“ee
Tech Toolbox: Internet of Things
Explore practical strategies for minimizing attack surfaces, managing memory efficiently, and securing firmware. Download now to ensure your IoT implementations remain secure, efficient, and future-ready.

EE Learning Center

EE Learning Center
“engineers
EXPAND YOUR KNOWLEDGE AND STAY CONNECTED
Get the latest info on technologies, tools and strategies for EE professionals.

HAVE A QUESTION?

Have a technical question about an article or other engineering questions? Check out our engineering forums EDABoard.com and Electro-Tech-Online.com where you can get those questions asked and answered by your peers!


RSS EDABOARD.com Discussions

  • Reducing "shoot-through" in offline Full Bridge SMPS?
  • High Side current sensing
  • How to simulate power electronics converter in PSpice?
  • Voltage mode pushpull is a nonsense SMPS?
  • Layout IRN reduction in Comparator

RSS Electro-Tech-Online.com Discussions

  • Back to the old BASIC days
  • Parts required for a personal project
  • PIC KIT 3 not able to program dsPIC
  • Failure of polypropylene motor-run capacitors
  • Siemens large industrial PLC parts

Featured – RPi Python Programming (27 Part)

  • RPi Python Programming 21: The SIM900A AT commands
  • RPi Python Programming 22: Calls & SMS using a SIM900A GSM-GPRS modem
  • RPi Python Programming 23: Interfacing a NEO-6MV2 GPS module with Raspberry Pi
  • RPi Python Programming 24: I2C explained
  • RPi Python Programming 25 – Synchronous serial communication in Raspberry Pi using I2C protocol
  • RPi Python Programming 26 – Interfacing ADXL345 accelerometer sensor with Raspberry Pi

Recent Articles

  • What is AWS IoT Core and when should you use it?
  • AC-DC power supply extends voltage range to 800 V DC
  • Infineon’s inductive sensor integrates coil system driver, signal conditioning circuits and DSP
  • Arm Cortex-M23 MCU delivers 87.5 µA/MHz active mode
  • STMicroelectronics releases automotive amplifiers with in-play open-load detection

EE ENGINEERING TRAINING DAYS

engineering

Submit a Guest Post

submit a guest post
Engineers Garage
  • Analog IC TIps
  • Connector Tips
  • Battery Power Tips
  • DesignFast
  • EDABoard Forums
  • EE World Online
  • Electro-Tech-Online Forums
  • EV Engineering
  • Microcontroller Tips
  • Power Electronic Tips
  • Sensor Tips
  • Test and Measurement Tips
  • 5G Technology World
  • Subscribe to our newsletter
  • About Us
  • Contact Us
  • Advertise

Copyright © 2025 WTWH Media LLC. All Rights Reserved. The material on this site may not be reproduced, distributed, transmitted, cached or otherwise used, except with the prior written permission of WTWH Media
Privacy Policy

Search Engineers Garage

  • Electronic Projects & Tutorials
    • Electronic Projects
      • Arduino Projects
      • AVR
      • Raspberry pi
      • ESP8266
      • BeagleBone
      • 8051 Microcontroller
      • ARM
      • PIC Microcontroller
      • STM32
    • Tutorials
      • Audio Electronics
      • Battery Management
      • Brainwave
      • Electric Vehicles
      • EMI/EMC/RFI
      • Hardware Filters
      • IoT tutorials
      • Power Tutorials
      • Python
      • Sensors
      • USB
      • VHDL
    • Circuit Design
    • Project Videos
    • Components
  • Articles
    • Tech Articles
    • Insight
    • Invention Stories
    • How to
    • What Is
  • News
    • Electronic Product News
    • Business News
    • Company/Start-up News
    • DIY Reviews
    • Guest Post
  • Forums
    • EDABoard.com
    • Electro-Tech-Online
    • EG Forum Archive
  • DigiKey Store
    • Cables, Wires
    • Connectors, Interconnect
    • Discrete
    • Electromechanical
    • Embedded Computers
    • Enclosures, Hardware, Office
    • Integrated Circuits (ICs)
    • Isolators
    • LED/Optoelectronics
    • Passive
    • Power, Circuit Protection
    • Programmers
    • RF, Wireless
    • Semiconductors
    • Sensors, Transducers
    • Test Products
    • Tools
  • Learn
    • eBooks/Tech Tips
    • Design Guides
    • Learning Center
    • Tech Toolboxes
    • Webinars & Digital Events
  • Resources
    • Digital Issues
    • EE Training Days
    • LEAP Awards
    • Podcasts
    • Webinars / Digital Events
    • White Papers
    • Engineering Diversity & Inclusion
    • DesignFast
  • Guest Post Guidelines
  • Advertise
  • Subscribe